Monday, August 19, 2013

Monday Report on English Paper Piecing

This past week, I got a little EPP done while I was listening to some unrelated training videos on the computer. Just a bit of progress, but it's twice as much as last week!


A couple of people have asked exactly what size my hexagons are. I printed and cut out card stock templates that are 5/16" (about 8mm) - so, pretty small.

Since I'm making these into a framed wall hanging, and since my templates are just plain, white card stock, I'm probably going to just leave the templates in when I frame this. Good thing, too, since this is what the flowers look like from the back. 


In the past, when I've made individual hexagon flowers this small to embellish projects, taking the templates out required tweezers!

I'm linking this post to this week's Monday Morning Star Count at Life Under Quilts.

Here's how progress is looking:
6 hexagon+background sets
9 colored hexagons
2 white hexagons


Wednesday, August 14, 2013

FreeMotion--QuiltAsYouGo--ShirtQuilt Combination

That post title is a mouthful, but pretty much says it all: this project combines three of my favorite quilting ideas!

For a long time, I've been intrigued by the Quilt-As-You-Go concept: the one where you quilt little squares with backing and batting, and join the bits-of-quilt together as the last step. Amanda Jean at CrazyMomQuilts posted about a Quilt-As-You-Go project a couple years ago; her blog posts here and here caught my eye at the time.

I've been meaning to give it a try for ages.

Last week, it occurred to me that I had a ton of 10.5" squares cut from shirts (ah, those favorite fabric designers!) And I also had some weird-shaped batting edges & scraps & leftovers that were 12"-20" wide ... 

So, I got busy. With a little extra weekend sewing time, I managed to quilt 20-something little quilt blocks, made of shirt fabric and batting scraps. Quilting such little squares (after some recent "quilt-wrestling" getting a queen-size quilt quilted) felt soooo easy, so I just kept going, and got a bunch done. 

A few of these FMQ designs are pretty standard and basic; several of the more interesting ones were inspired or learned from other people's blogs, so I'm including links where possible in the captions below each picture.

This is the first (and for a long time, the only) style of FMQ I ever tried.
The basic stipple. Still my go-to favorite.

Loopy FMQ. Another all-time favorite.

This was a new style for me - triangle "loops".
I'd seen it used a couple places, liked it, tried it.

Adding flowers into the basic stipple just seemed worth a try.

OK. I don't like this one. I'd heard that a great way to make a circle when quilting is to stick a pin through the fabric, into a hole in the sewing machine surface, and use that as a pivot-point/center-of-circle, and just sew around. Yeah. Well. The only hole in my machine surface must be too big; the pin moved; the circles are not circle. Lesson learned.

Pebble quilting. I'd seen it used very effectively in a landscape quilt somewhere (can't seem to find the link ... Update: Aha! Found it: "Sticks and Stones" Quilt from City House Studio), and also these quilts, and figured it would be worth a try. Last year, I pebble-quilted the whole background on three different baby quilts I made. Love it!

Learned this from The Free Motion Quilting Project - Paisley

I'm not sure what this is ... but it reminds me of peacock feathers, kind of ...
another variation on my favorite stipple.

There's an easy tutorial on this Crosshatch Grid from CrazyMomQuilts

Flowing Glass, from The Free Motion Quilting Project

Bright Star, from The Free Motion Quilt Project

Stone Portals, from The Free Motion Quilt Project

Mario Vine from The Free Motion Quilt Project

Wavy Crosshatch, inspiration from CrazyMomQuilts

River Path, from The Free Motion Quilt Project

Echo Flowers ... inspired by someone's pictures of a wholecloth project ...
can't seem to find the link ...

Floral Spiral - seems like I saw something like this at CrazyMomQuilts, but I can't seem to find where ...

I started trying to make Shadow Waves from the Free Motion Quilting Project, but decided to crosshatch it and make it more like Matrix.

This one's called Microscopic World, from the Free Motion Quilting Project 

Keepin' it real: The back of this one ... has a problem ...
The upper-left corner got stuck underneath while I was quilting it,
so I have to figure out what to do about it. :-)

Feathers. Not perfect, but not bad for a first try.

Baptist Fans - No idea why they call them Baptist,
but inspiration came from here, and I liked the style,
since many of Tonya Ricucci's hand-quilted quilts
in that book I have are quilted with a similar design. 

Loopy Lines - Inspired by
the design included in this post from CrazyMomQuilts

This is the layout idea - imagine the white batting-edges trimmed and replaced with either brown or navy fabric strips ...

This is the back of the layout, in the same order as the previous picture.
I decided to quilt all these with shirt-fabric solids on front,
and shirt-fabric stripes/plaids on the back.
The next step will be trimming these up and attaching them - I'm planning to use the method in this video to attach them to each other.

And I've discovered that I LOVE variegated thread for quilting on solids. I just found that out - & may have mentioned it in my earlier post. All of these blocks were quilted with the same variegated thread. (Granted, some of the quilting styles look better in variegated thread than others, but I'm having fun figuring that out.)

When Friday comes, I'm planning to link this post to this week's FMQ Friday at The Free Motion Quilting Project, where there are usually a bunch of amazing & inspiring FMQ projects to see.


Monday, August 12, 2013

Working on Free Motion Quilting

I'll probably include more pictures and details another day, but here are a couple snapshots ... I've been having some fun with FMQ lately ...

And I've discovered the wonder that is variegated thread!


You know you've gotten a lot quilted when you've taken out this many safety pins!


Lots of swirls and loops on this one!

 
Stay tuned for more details!

A Little Bit of Little EPP

So ... I've been trying the Blogger app on my phone, and it keeps doing weird things. This post was published, but then disappeared, so I'm updating/redoing ... 

This past week, I did just a little bit of English Paper Piecing. Just a little, but it's more progress than I had last week. Just enough to link up with this week's Monday Morning Star Count at Life Under Quilts ...


Here are the pieces I've got partially assembled for my little wallhanging.


I've had several other sewing projects in the works, and I'm hoping to blog about some of them later this week, so stay tuned!


Friday, August 2, 2013

The Scrappy Shirt Quilt: Finished!


Not long ago, I finished up the straight lines and swirly lines on the quilt. I like how the quilting looks from the front, but I think it shows up well on the back, too.


This past week, I put the binding on The Scrappy Shirt Quilt.


I started sewing on The Scrappy Shirt Quilt several months ago, making Nine-Patches and Snowball Corners with fabrics cut from cotton shirts. 


Actually, last fall, I had this idea for a shirt quilt, so I started on (and blogged about) a smaller quilt top a little bit like this one, as a sort of "test run. In January, I wrote a picture tutorial on the easy Snowball Corners I was making. 


I blogged in January and February about the Nine-Patches and Snowball-Corner blocks I'd made, and in April, I added a border, pieced a back, and started quilting. July saw the last of the quilting.


This past week, I was pleased to finally finish putting the binding on. 
Lots and lots of solid green binding.  


One of the things I love about this quilt is that all of the patchwork is made from recycled 100% cotton shirts. All the nine-patches and snowball blocks - even the yellow and white "background": all shirts! I'm fond of mentioning these fabrics as having come from my favorite fabric designers


The light blue border on the front of the quilt is shirt-weight fabric, and I think it's one of the fabrics my grandmother sent me many years ago. She loved sewing, too, so she would occasionally send me a box of fabric and lace, and she'd remind me of the story of when I was little and would ask her for pieces of lace and fabric so I could "make cute things".


It was fun to put the back of the quilt together. All the light-colored squares on the back are cut from shirts. The dark-blue-and-white floral wasn't a shirt (obviously), but as I mentioned in the April post, I decided to use this fabric "inside-out", because the fabric reminded me of how the waiters at my dad's restaurant always wore Hawaiian shirts that were sewn with the fabric "inside-out", so that the colors on the outside of the shirt were the lighter, more muted versions of the bold-colored fabric. Hawaiian shirts like that make me smile, remembering that as a kid, I found that style odd, but intriguing. 


The green binding fabric has no relation to shirts, but it was in the right place at the right time, and blends well with the colors and style of the quilt. 

This quilt is bigger than most of the ones I've made: it's 70" x 80". 


I'm linking this post to this week's Finish It Up Friday at CrazyMomQuilts, and looking forward to taking a look at some other quilt bloggers' recent finishes there.

Thursday, August 1, 2013

Double Wedding Ring - Gingham style

I've been trying something new ...


Perhaps inspired by the idea of the Double Wedding Ring Quilting challenge, and definitely inspired by another blogger who's been making a beautiful first-ever Double Wedding Ring quilt ... I've been thinking that if I could make a block, I could probably try making an actual quilt with some batik fabric I just bought ...

So, for starters, I traced templates onto gingham ...


... did some sewing ...


... and some seam-ripping ...


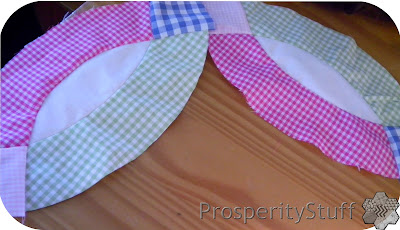
... and got things almost flat, after lots of pressing ...


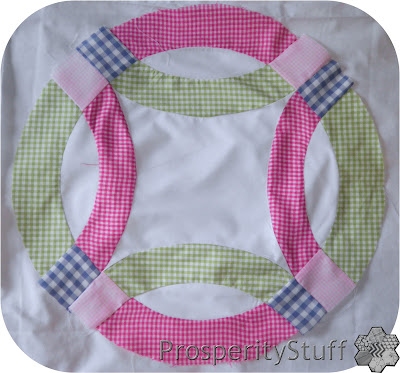
... and made my version of a Double Wedding Ring quilt block!


 For now, the "block" is round, so I guess I should add "corners" in white to get it ready to join the other gingham blocks in my sampler quilt ...


I'm making this up as I go along, but the plan is to have white sashing between however many gingham blocks I end up making ... So far, the block total is up to 8!


Related Posts Plugin for WordPress, Blogger...