Showing posts with label Quilt Styles. Show all posts

Monday, April 15, 2013

Quilts on the Clothesline

I'm not one to take my quilts on photo-shoot field-trips. I don't recall ever laying a quilt on the grass or on the snow or on a playground for a photo op. Apparently, those are "the things" to do if you're a quilt-blogger. (And I have to say, there are some impressive quilt-photos out there!)

Since I'm a regular-mom-quilt-blogger, my finished-quilt-pics usually happen on my living room floor. Or couch. Or chair.

That being said, my quilts do sometimes hang on the clothesline, to dry, after being washed.


Windy spring days are just right for quilts to be on the line.


My oldest daughter took these pictures of the quilts on the clothesline.


The kids kept looking out the window at the quilts on the line, and commenting on how great the quilts look from afar.


The girls were impressed that the log cabin quilt looks "so different" on the clothesline than on a bed. This quilt (below) was the first twin-sized log cabin quilt I ever made. It's been in the girls' room off and on pretty much forever. But I guess seeing the blocks up close makes it harder to see the overall/secondary patterns ...


It's fun how the wind and the sunshine & shadows play with the quilts on the line.


These two quilts below are two of the first twin-sized scrap quilts I ever made.


And the fresh spring air makes the quilts smell wonderful!


Wednesday, March 7, 2012

Starting a Sudoku Quilt

Here's a project that's gotten from the "in my head" stage to the "on paper" stage ... This is the preliminary work, even though it'll probably be a while before I get this cut out and sewn together.


I'm going to make a Sudoku Quilt. Or quilt top. Or, most likely, mini quilt top. Sudoku Mini Quilt Top.

Here's my stack of 9 fabrics.


I like the neat organization of the numbers in Sudoku puzzles, where every group of 9, every row of 9, and every column of 9, each contains the numerals 1-9 in without repeating within the group, row, column. 

So, to turn the concept into a quilt, the trick is, assign each of your fabrics a number, and arrange them like a solved Sudoku puzzle (or, to be on the safe side, the answer-key to a Sudoku puzzle!)

Here's my layout ...


I'm still thinking about sashing/border colors ... so we'll see what kind of look we end up with.
So far, so good!

Monday, March 5, 2012

New Twist on Old Patchwork

A while back, I made this cute quilt top. Figured it would be a simple one to put together and sell on eBay for somebody to quilt.


It didn't sell, after being listed umpteen times. But, I didn't feel like spending more time on the quilt top, either, so, I just left it there not selling ...

But I recently had an idea, and I got the idea to work, so I've given this quilt top a new twist!

Several weeks ago, I read this blog post by Elizabeth at Pieceful Life, and I was really intrigued. I had to try that process. Seemed like a good way to spruce up the (cute but) plain quilt top.

Elizabeth's blog post does a great job of explaining the how-tos, so I'll mostly just show you pictures ...

Not having the exact tool Elizabeth used, I improvised (read: I measured and drew lines on a square ruler with a Sharpie marker). Then I lined up my marker-lines-on-ruler with my seams, and (gasp!) cut little square holes out of a perfectly good quilt top.


(Takes a little getting used to ...)


Pretty cool, though! 


It's fun to watch the layout come together!

Lots of fun! (Lots of little Winnie-the-Pooh details, too!)


My original quilt top had a narrow border, so Elizabeth's (much more impressive) border option (wide border worked into the pinwheels) didn't work for my quilt top. So I added some coordinating fabric. And some little postage-stamp-y scraps that were left when I cut holes in the middle of the quilt top.


I like it! This was a fun project. Even though, after all that sewing, the quilt top is still about the same size, it's much more nifty. 


I'll probably list the new version of this quilt top on eBay. Or Etsy. Something like that. 


Anyway, I'm linking this post to this week's Little Quilt Monday at Elizabeth's blog ... Check the link for some really great inspiration!

Thursday, January 12, 2012

Kaleidoscopes!

A few years ago, I discovered quilty Kaleidoscopes. I love them! 

There are several kinds, but the common factor involves the use of identical pieces arranged into a kaleidoscope. (When I was trying out the concept for the first few times, I searched Google for "quilt kaleidoscope" or "stack & whack quilt" for pictures and tutorials.)

Here are a few Kaleidoscope types I've made:
The six-triangles kind ...


The four-squares kind (also called "stacked posies") ...


And the eight-pointed kind ...


A couple of these kaleidoscope-y things will be showing up in other posts soon ... so, stay tuned!

Tuesday, December 6, 2011

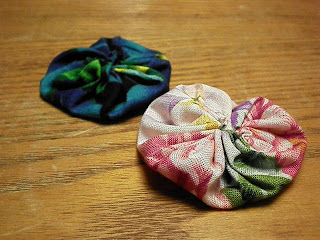
Random Yo-Yos ...

A couple of years ago, a friend mentioned that she'd love to learn how to make old-fashioned yo-yo quilts ... neither she nor I had ever made a yo-yo, but we both thought it would be fun. As it turns out, each of us went home and searched Google for the how-to details!

I recently rediscovered my stack of little yo-yos, and I'm once again delighted with the fun randomness of these. Even though I usually like an "organized" feel to my quilting, I'm loving the non-organized look here.

ProsperityStuff Random Quilt YoYos

Lots of these fabrics make me smile, because they remind me of what else I made with that fabric, or where that fabric came from ... I love the colors and the circles and the spaces between ...

ProsperityStuff Quilt YoYos Closeup

Since the Christmas Hexagons are just about done, I needed some hand-work to put in my favorite bag-to-grab-when-I'm-going-somewhere ... Recently, I pulled out the fun, random yo-yos and worked a little while.

ProsperityStuff Quilt YoYos

One of the fun things about sewing when other people are around (which is all the time unless everybody's asleep) is that sometimes, somebody wants to learn "how you do that". That's neat, because usually they discover that it's not hard, and it's pretty fun! My middle daughter sat with me and made a couple of yo-yos ...
ProsperityStuff 2 Little Quilt YoYos

Right now, I'm sewing the random yo-yos in groups of 16, so that they're partially assembled, with some flexibility in how I eventually work the layout.

ProsperityStuff Quilt YoYo 16s

I also have some blue yo-yos happening in another project-bag ....
Maybe I'll blog about those another day ...

Take Your Time Tuesday at So Happy is a fun spot to mention hand-stitching work like this ... So I'm planning to link this post to this week's Take Your Time Tuesday ...

Fabric Tuesday at QuiltStory is another fun place to see fabric projects of all kinds, and I'm linking this post to this week's Fabric Tuesday, as well. (Click the button below for the most recent Fabric Tuesday).


Fresh Poppy Design


Wednesday, November 23, 2011

Quilt Top a Dozen Years Later ...

A couple of weeks ago, I reached a milestone in an ongoing project of mine ... After a very (very) long time, I finished piecing a quilt top that I've been working on (off and on) for a dozen years! Yes. A dozen.


You know those projects that you love, that you want to do "just right", that you procrastinate about? (Do you have those kind?) This is one of those. I love it.

This one started out ages ago when I had made about one quilt. I knew I could quilt, so I was gathering fabric here and there, when I found fabric I liked.

When I saw a quilt at my friend Dianne's house, I fell in love with it. There was an awesome quilt on her guestroom bed. So I drew her quilt on the only scrap of paper I had handy.


Since I had the fabric, and loved the quilt pattern, I decided to go for it, even though this quilt involved diamonds. I'd told myself I wouldn't mess with diamonds again after piecing the other diamonds quilt.

I figured and measured and computerized my quilt design (back when I didn't even know they had computer-quilt-design software) ... I'm pretty sure my mom helped me figure and calculate and plan ...


I colored in the "pattern". And cut fabric. And sorted. And put pieces in little baggies. All organized.

The quilt top, and its backing fabric, and its extra scraps have spent a lot of time in this box ... It's a good feeling to finally have the quilt top constructed.


 In fact, the same afternoon that I got the quilt top done, I immediately went to the store and bought batting and safety pins. For the next step. So that I can pin it and start to quilt it. Because I've had the backing fabric ever since I started the quilt. A dozen years ago.

So, yes, it's not quilted yet. I'm planning to machine quilt. Because I know myself. And I know that the last time I decided to hand-quilt a big project, it was a decade-long process of off and on ... Like I said, that hand-quilted quilt was, and is, awesome. So awesome that it has lived on my bed ever since I finished quilting it. But I think I'll machine-quilt this newest quilt, so that it won't take another decade ... Stay tuned ...


Since this is definitely a work in progress, I'm linking this post to Work in Progress Wednesday at Freshly Pieced ... Click the button below to see some other great works in progress!

WIP Wednesday at Freshly Pieced

Monday, November 21, 2011

The first big quilt ...

This is the first big quilt I made ... Machine-pieced, hand quilted ... 


I've always loved variety, and so, the color scheme (or lack thereof?) reflects that.

This is the quilt I decided to start making when I was a teenager. (Yes. That long ago. More on that later.) My mom and I shopped for fabric, and I used her rotary cutting stuff to cut allllll those diamonds. And triangles. And squares.

After I got all the piecing done, I decided to quilt it by hand. By. Hand.
Flowers in the empty navy blue squares ...
Stars around the stars ...
 
Waves and curlicues on the edging ...

As often happens to my projects, I got a little distracted from the project when I was nearly done. I had half of the hand quilting done, and then I stopped. (At least I had a good excuse ... During the decade that I didn't work on the hand quilting, I got married, moved to a new state, and had five awesome kids ... )

When I finally realized that the quilt was halfway quilted, I decided to try for a little bit of consistent work in the evenings when the kids were in bed. Sure enough, it got done. More than a decade after starting ... Voila!

I finished it a couple of years ago. It has lived on my bed ever since. 


Friday, November 18, 2011

Quilt Circles ...

I love the fact that quilting gives me chances to make and accomplish things. I also love that quilting gives me the occasional satisfaction of trying (often even succeeding at) something new.

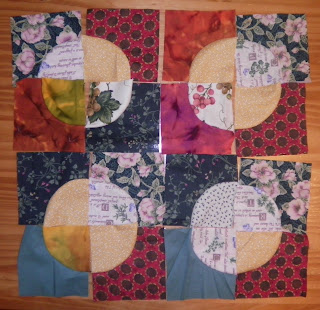
Not too long ago, I tried a new quilt pattern/style for the first time: The "Drunkard's Path" Block. Curved pieces and curved seams have always seemed a little intimidating ... but after watching how "do-able" it seemed in the online tutorials/videos, I figured I should give it a try.

Here are a few of the blocks I put together, just laid out on the table:

ProsperityStuff Circle Quilt Drunkard's Path blocks

When I started assembling these blocks into circles, my youngest son declared that "They look like moons!" Which is true. So this one got dubbed "Harvest Moons".

ProsperityStuff Circle Quilt Drunkard's Path

It turned into a nice-sized quilt top for my eBay listings ...

ProsperityStuff Circle Quilt Harvest Moon


Looking on Google for layout ideas for this block, I found no shortage of ideas ... It's amazing what you can do with that quarter-circle-sewed-into-a-square ...

Here's a totally different layout I tried - The whole center section of this quilt top was made with Drunkard's Path Blocks ... I was pleased with how this little quilt top turned out.
ProsperityStuff Circle Quilt Drunkard's Path Harvest Moon

Wednesday, November 9, 2011

Mariner's Compass

I mentioned English Paper Piecing in a previous post ... It's a hand-stitching method that I love. 

Recently, I tried a new kind of paper piecing. It's called, not surprisingly, "Paper Piecing". Yeah. Despite the similar names, they're nothing alike. Read on.

Lately, I've been fascinated by pictures of a quilt block design called Mariner's Compass. Really impressive. So, of course, I had to try the paper-piecing technique that's used to make a Mariner's Compass block.

paper piecing mariners compass quilt block

One version of paper piecing instructions involves freezer paper, which was not handy; the other uses tracing paper, of which I have plenty. I found a free pattern online, printed it on my tracing paper, and got out a big piece of multi-colored fabric.

I figured the stripes would give me a wide color-range, and it was a non-favorite piece of fabric, so I could relax about my first try at this. As it turns out, I do not recommend stripes for paper-piecing Mariner's Compass blocks ...

mariners compass quilt block pieces

It's taking a while to get used to this paper-piecing process ... and this is not likely to become my favorite method of patchwork-ing anytime soon ... but I got a Mariner's Compass done. 

mariners compass quilt block

You can't tell it, but there are 32 pieces in this compass. (Like I said, it's the stripes ...)

So, next time, I'll try something more solid-like. Nifty-looking anyway, and it was a pretty satisfactory first try.
Related Posts Plugin for WordPress, Blogger...