This is a new addition to my homemade Christmas decorations ... It measures 13" x 13".
Here's how this Mini-Quilt came to be ...
Here's how this Mini-Quilt came to be ...
Not long ago, I found a great deal on some little glass Nativity figures. They came with a little mirror to sit on, but I thought something quilt-y might be a nice addition ...
(Also, I'll probably link this post to "Little Quilt Monday" at Pieceful Life when Monday rolls around.)
So, I started playing with my scraps. I wanted a lot of white, and something with red-and-green squares. I still wasn't sure about an overall shape for the mini-quilt.
So, I started playing with my scraps. I wanted a lot of white, and something with red-and-green squares. I still wasn't sure about an overall shape for the mini-quilt.
After making some nine-patches out of 1 ½" squares, I decided to try for something sort of circular in the center, with the nine-patches around the edges ... So I ended up with an octagon in the middle, and 8 little nine-patches around the edges. I had some (too big) triangles left over from another project, so I put those in the extra spaces ...
Got it all stitched ...
When I trimmed the excess off of the giant triangles ... I also cut the backing at the same time ... With the 8 triangles, and the 8 nine-patches, it became more than just an octagon ... more like a hexadecimal polygon whose name I don't know. (Is there even a name for that shape?)
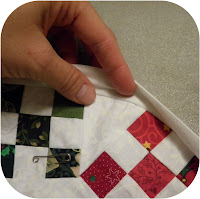
Since I wanted this mini quilt to be like a little doily, flat enough for the glass Nativity figures to stand on, I didn't want to add puffy batting ... So I used a piece of white sheet for the backing, with no batting in between the layers. After cutting, I "basted" the quilt top to the backing layer with safety pins.
For the binding, I made some bias binding out of the same white sheet. I folded the bias binding in half, and stitched both raw edges to the quilt-and-backing "sandwich". As I was stitching the binding on, I gently rounded the corners of the polygon, to give the finished piece a rounded edge.
After stitching the binding on, and turning the folded binding-edge around to the back, I quilted in the ditch around the edge, and again around the edge of the center octagon.
Voila! It measures 13" x 13".
I'm really pleased with how this Mini-Quilt turned out.
Making some of my own Christmas decorations helps me look forward to Christmas a little more, and helps me enjoy the process of teaching my kids more about the true meaning of Christmas.
"For the Son of Man is come to seek and to save that which was lost." (Luke 19:10)
"For the Son of Man is come to seek and to save that which was lost." (Luke 19:10)


how cute - and a very clever idea!
ReplyDeleteWhat a sweet idea! :o)
ReplyDeleteIt's wonderful! I like how it looks with the nativity... well done!
ReplyDeleteLOve it and I just may have to give it a try sometime : )
ReplyDeleteThis looks great! Binding on a curve - so impressive!
ReplyDeleteoh gosh - brilliant addition to the nativity!
ReplyDeleteWonderful work! It looks perfect with your nativity....very creative!
ReplyDeleteWow... I am super impressed with how you figured out the design for this. It's just perfect for your nativity scene. Beautiful!
ReplyDeletevery, very nice!
ReplyDeleteWow that is the best thing I have seen in a long time! Great design!
ReplyDeleteVery pretty mini quilt, and a great tutorial! Thanks for sharing.
ReplyDelete