Monday, June 26, 2017

Kaleidoscope Roses

I love rose print fabrics turned into kaleidoscopes!
This was a long piece of fabric from my mother-in-laws's attic.


When I was trying to figure out how to use this fabric, I realized how long it's been since I've made kaleidoscopes.


To make hexagonal kaleidoscopes, six layers of fabric are laid with the printed design exactly matching, and then 60° triangles are cut, so that six identical triangles result.


I gave myself permission to be not-quite exact, knowing how hard it is to get exactly identical triangles out of fabric that might have shrunk, or stretched, or printed funny. I've discovered that perfectionism on kaleidoscopes is time-consuming and frustrating, and isn't necessary for a pleasing result. :-)

So, this has been a fun project.

Saturday, June 24, 2017

Weather, 25 weeks in ...

This weather quilt has been lots of fun so far.
Each horizontal row represents a week, and the color of each segment is determined by that day's high temperature.

This is 25 weeks of weather, quilt-style, out of the 52+ weeks in a year. 


So far, it's been fun to watch the weather "trends" as illustrated in fabric. Lots of teal and blue and green early in the year; lots of yellow and orange now.


Since a variety of fabric is fun, and since I have (and occasionally purchase) lots of random bits of fabric, it made the most sense to use a color range (rather than one specific fabric print or solid) to represent each temperature range. 


I've cut a bunch of fun reds ... for the 100°+ days that are sure to come in July and August. That kind of weather is not my favorite, but I am looking forward to the interest it will add to the middle of my temperature quilt!


My original calculations had this quilt ending up longer than it is wide. But from the looks of this part of the quilt (almost half a year), it's looking like it'll be about 90" square when it's done. Not a bad size. But I may add some tall borders to the top and bottom (maybe a black piano key border?) to give it another 10 or 12 inches of length. We shall see ...


Tuesday, June 13, 2017

O Christmas Tree ...

I recently bought a new tool and wanted to try it out ... The Tri-Recs ruler set intrigued me, and to make blocks out of triangles that are different than my usual 60-degree or 45-degree ones, it made sense to have the special ruler set.

ProsperityStuff pic of Tri-Recs ruler tool


It happens that I had collected a bag of super-random Christmas prints for pennies at thrift stores, and I thought it would be fun to make a Christmas Tree quilt ... something like the ones I've pinned on Pinterest ... this pin or this pin or this one.

ProsperityStuff Christmas Tree Triangles

ProsperityStuff Christmas Tree Triangles with Tri-Recs ruler tool

In between other things (and to test my most-recently-cleaned-and-oiled sewing machines), I sewed together a few dozen of these:

ProsperityStuff Christmas Tree Quilt blocks made with Tri-Recs ruler tool

I think they'll make a fun Christmas quilt ... eventually!


Monday, June 12, 2017

Little Red and White Patchwork

I recently came across a bunch of red fabric for a bargain price in my thrift-store shopping.
Looking for a simple/fast pattern to make, I found this pin on Pinterest.

So, here's the beginning of a little quilt top (un-ironed, and photographed with my phone) ...


I'm not sure if I have enough contrast between the "reds" and the "whites" in some cases. And also, some of the solid reds are maybe a little too intense. 


But for now, I'm going with it. It's a fun, fast design ... 4-patches made from squares cut at 4.5", and 16-patches made from squares cut at 2.5" -- my favorite sizes!

I started off doing these Leader-and-Ender style, then spent a little while putting these few blocks together.


Thursday, June 8, 2017

Joanna's Nautical Quilt

I recently finished this nautical-themed quilt as a custom order for my friend Joanna.

ProsperityStuff Nautical Quilt made of Shirts

This was a fun design challenge, and a special project to work on.

A couple of months ago, Joanna sent me a message, asking if I could work on a quilt for her family. A dear relative of theirs was cleaning out his closet, and had given them a stack of shirts. Not being able to use the shirts, but not wanting to give them away, Joanna had the inspiration to ask about turning the shirts into a quilt.

A nautical theme was chosen, which is a perfect fit - many of the shirts were nautical prints and colors, and this relative loves all things nautical.

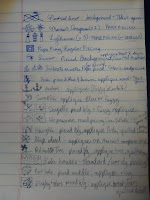
I started out with these stacks of shirts, and a list of nautical quilt-block ideas ...

ProsperityStuff Shirts to make into a quiltProsperityStuff More shirts to make into a quiltProsperityStuff notes for nautical quilt

 After some design work, I sent Joanna this drawing as the plan ...

ProsperityStuff Concept Art for Nautical Quilt

And then, there was a lot of cutting and measuring and figuring and stitching and quilting!
I may have mentioned before on this blog that my favorite "quilt fabric designers" involve shirt fabrics! I've made quite a few quilts out of men's dress shirts (see the label in my blog sidebar "Dress Shirt Quilts"), and this one was a lot of fun.

Here are a few close-ups, in various stages of assembly ...

Mariner's compasses, and life preservers ...

ProsperityStuff Mariner's Compass for Nautical QuiltProsperityStuff Life Preservers in progress for Nautical Quilt

Lighthouses, of course! Just pieced, before quilting in the details ... 

ProsperityStuff Lighthouse in progress for Nautical Quilt ProsperityStuff Lighthouse in progress for Nautical Quilt ProsperityStuff Lighthouse in progress for Nautical Quilt

Nautical knot and rowboat  ...

ProsperityStuff Nautical Knot in progress for Nautical Quilt ProsperityStuff Rowboat for Nautical Quilt 

Ship's wheel getting some "wood grain" quilting ...

ProsperityStuff Ship's Wheel gets "wood grain" FMQ for Nautical Quilt

An assortment of blocks in progress ...

ProsperityStuff Blocks for Nautical Quilt: Anchors, Lighthouse, Palm Tree, Mariner's Compass, Swordfish

Sailboats!

ProsperityStuff Blocks for Nautical Quilt: 3 Varieties of Sailboat!

Lake Houses and a sunset ...

ProsperityStuff Block for Nautical Quilt: Lake HousesProsperityStuff Block for Nautical Quilt: Sailboat in the Sunset

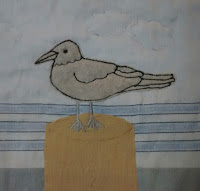
Sea gulls, made from a fleece shirt ...

ProsperityStuff Block for Nautical Quilt: Standing SeagullProsperityStuff Block for Nautical Quilt: Seagull standing on wood

With plenty of shirts (about 2 dozen), I made the borders and backing out of shirt fabric, too!

Here are borders in progress ...

ProsperityStuff Border for Nautical Quilt: Piano-Key style

The back includes big shirt pieces, small shirt pieces, and quite a few shirt tags!

ProsperityStuff Back for Nautical Quilt: Shirts and Tags

Here's the entire quilt back.

ProsperityStuff Complete Back for Nautical Quilt: Shirts and Tags with Piano-Key style border

I decided to use a quilt-as-you-go assembly method (like I used for this quilt and one of these ones), to give each block its own custom technique. This was helpful, since I had a variety of pieced and appliquƩ blocks that need a variety of quilting techniques. Each block (or border row) was put together: front, batting, and backing, and it was quilted all by itself before being put together with the other parts of the quilt.

One of the fun things about this quilt is that all of the fabric in it came from that stack of shirts, except for the tiny gray borders between each block and row, and the solid white fabric. 

Even though I don't usually, I decided to take this quilt outside and lay it on a sheet for a whole-quilt photo. That seemed like the best place to get a full view of the quilt.

ProsperityStuff Nautical Quilt made from men's shirts

ProsperityStuff Nautical Quilt made from men's shirts

I know how much my family enjoys having quilts around to keep cozy, and I hope Joanna's family will get just as much enjoyment out of theirs!


One of my favorite quilt blogs, which is full of lots of quilt-y inspiration, has a weekly link party for finished quilt projects. I'll be linking this post to this week's Finish It Up Friday at CrazyMomQuilts, and I'm looking forward to seeing what other quilters have been working on and finishing up this week.

Monday, May 15, 2017

Weather Quilt ... 19 weeks down!

It's been a few weeks since I've posted about my weather quilt, so here's a quick picture update.

This past week was a landmark week for the quilt: the first orange fabrics (90° days)!

The quilt top is getting bigger, so it's getting harder to take a quick photo of the whole thing at once ... So here are 2 pictures: 

left side ... 


and right side ...


Already, it's fun to see a bit of the seasonal change in temperature ... Lots of highs in the 80°s (yellow) lately, compared to almost none early in the year. 

I'm collecting my red scraps for the many inevitable 100°+ days coming up this summer!!

Saturday, February 4, 2017

Raggedy Ann ... From the attic!

Occasionally, my husband's parents find fun things in their attic that they don't still need. If they think I might use them, they pass them along. A few years ago, they gave me a couple of preprinted Raggedy Ann doll/dress sets ... the kind that are preprinted on fabric. I kept thinking that one of these years, my girls or I might sew them. 

I finally took the time to finish up a Raggedy Ann doll!


I had some extra sewing time one weekend, and worked on that orange quilt project leader-and-ender style, in between getting this Raggedy Ann doll and her clothes sewn.


I had fun trying out a new tiny-rolled-hem presser-foot for the hems on the little clothes ...


It's about a 20" Raggedy Ann doll, so it was small, but still, I was surprised to get so much done in one (long) sitting!


What fun! My baby daughter got this Raggedy Ann doll for her recent birthday.


I got this much done in that one (long) sewing session: (the doll + clothes, but no yarn hair) while also assembling this much of the center of that orange quilt top.


A couple weeks later, I stitched in the yarn hair. 

Black hair on a Raggedy Ann doll? Yes!


When I was little, my sister and I had a giant Raggedy Ann doll, made by our great-aunt. The doll's yarn hair was black. So, of course, decades later, when my sister made giant Raggedy Ann & Andy dolls for my older girls, she made them with black yarn hair. And, so, it only made sense, that the newest little doll have black yarn hair, too.


Related Posts Plugin for WordPress, Blogger...